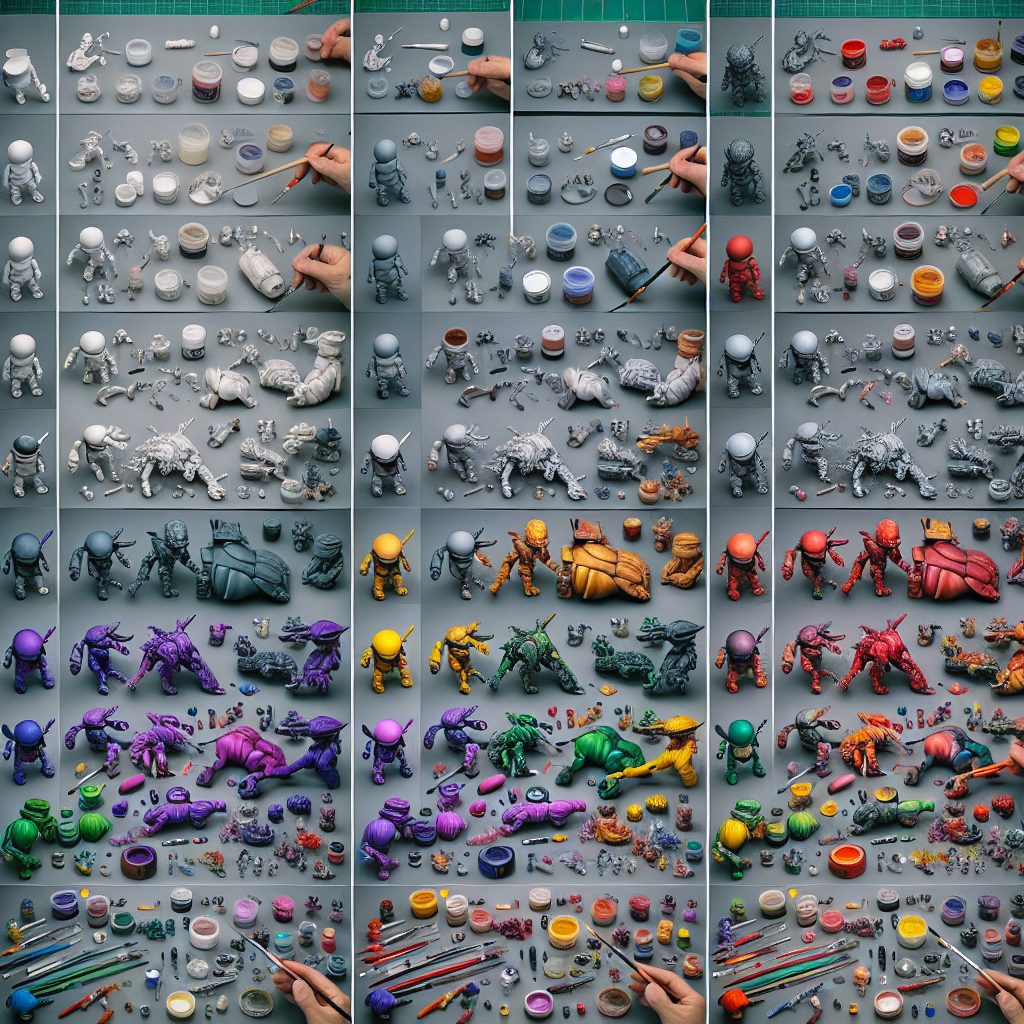
Step-by-Step Tutorials for Unique Toy Painting Techniques offer an exciting opportunity for both beginners and experienced artists to explore their creativity and transform their toys into unique works of art. Painting toys is not only a fun and enjoyable activity but also allows individuals to personalize their playthings and breathe new life into old or plain-looking toys. With the help of step-by-step tutorials, aspiring artists can learn different techniques to create eye-catching designs, from vibrant color patterns to intricate detailing.
These tutorials offer a wealth of knowledge on various toy painting techniques, providing artists with the necessary guidance to achieve professional-looking results. Whether you are interested in mastering the art of airbrushing or learning how to blend colors seamlessly, these tutorials offer a valuable resource to enhance your skills. Moreover, they provide helpful tips and tricks for choosing the right paints, brushes, and other materials to ensure the best possible outcome. By following these step-by-step instructions, individuals can unlock their artistic potential and create one-of-a-kind pieces that reflect their personal style.
In the upcoming part of this article, we will explore the key takeaways from these tutorials, covering a range of techniques and tips to help you get started on your toy painting journey. From understanding the fundamentals of color theory to mastering basic brush strokes, we will delve into the essential aspects that will empower you to create stunning toy designs. Furthermore, we will discuss how these tutorials can help you develop your own unique style and share inspiring examples of artists who have successfully transformed ordinary toys into extraordinary works of art. Stay tuned for an in-depth exploration of each technique, as we provide step-by-step instructions and expert insights to support your journey towards becoming a skilled toy painter.
Key Takeaways
1. Learning unique toy painting techniques is now easier with step-by-step tutorials, which provide clear instructions and guidance for painting various types of toys.
2. Different toy painting techniques, such as dry brushing, washes, and weathering, can add depth, texture, and realism to your toy creations, elevating their overall appearance and value.
3. Step-by-step tutorials demonstrate how to choose the right paint colors, mix them effectively, and apply them with precision, allowing you to achieve the desired effects on your toys.
4. These tutorials also provide valuable tips and tricks for enhancing the finer details of your toys, such as using fine brushes, adding highlights and shadows, or creating intricate patterns, resulting in more visually stunning and professional-looking toys.
5. By following the step-by-step tutorials, you can unlock your creativity and explore new techniques, enabling you to customize your toys in unique and personalized ways that will impress both collectors and enthusiasts alike.
How to Master Step-by-Step Tutorials for Unique Toy Painting Techniques?
Choosing the Right Toy and Paint
Before diving into the step-by-step tutorials, it’s important to select the right toy and paint materials for your project. Consider the type of toy you want to paint and what type of paint will adhere best to its surface. Acrylic paints are commonly used for toy painting due to their versatility, durability, and vibrant colors.
Preparing the Toy
Prior to starting your painting process, it’s crucial to properly prepare the toy’s surface. Begin by cleaning the toy thoroughly using a mild soap and water solution. This removes any dirt, dust, or grease that may hinder the paint’s adhesion. Let the toy dry completely before moving on to the next step.
Priming the Toy
Priming the toy creates a smooth and even surface for paint application. Apply a thin and even coat of primer specifically designed for the material of your toy. Use a brush or spray primer, following the manufacturer’s instructions carefully. Allow the primer to dry completely before proceeding.
Sketching Your Design
To ensure a guided painting process, sketch your desired design on the toy using a pencil or a washable marker. This step will help you visualize the final outcome and avoid mistakes during painting.
Layering Techniques
One way to create depth and dimension in your toy painting is through layering techniques. Start with the background colors and gradually build up the layers. Allow each layer to dry before adding the next, ensuring smooth transitions between colors.
Blending Colors
Blending colors gives your toy painting a softer and more realistic appearance. Use a dry brush or a blending tool to mix and merge colors seamlessly. Experiment with different brush strokes and techniques to achieve the desired effect.
Adding Details
As you progress with your toy painting, focus on adding intricate details that bring your design to life. Use fine brushes and precise strokes to incorporate small patterns, textures, or highlights. Patience and attention to detail are essential in this step.
Protecting and Sealing the Paint
Once you’re satisfied with your toy painting, it’s crucial to protect and seal the paint to ensure its longevity. Apply a clear coat or varnish specifically designed for toy painting to safeguard the colors and prevent chipping or fading. Follow the manufacturer’s instructions for proper application and drying times.
Top Tips for Mastering Step-by-Step Tutorials for Unique Toy Painting Techniques
- Practice on smaller objects or spare toys before attempting more complex projects.
- Experiment with different brush sizes, shapes, and bristle types to achieve different effects.
- Take breaks during the painting process to assess your progress and make any necessary adjustments.
- Use reference images or photographs to inspire your designs and help with color selection.
- Don’t be afraid to make mistakes – they can often lead to innovative and unique results.
- Clean your brushes thoroughly after each painting session to maintain their quality.
- Consider joining online communities or forums to connect with fellow toy painting enthusiasts and get valuable tips and feedback.
- Regularly update your toy painting skills by exploring new techniques and staying informed about new materials and products.
Frequently Asked Questions
1. Can I use any type of paint for toy painting?
Yes, you can use various types of paint for toy painting, including acrylic, enamel, and watercolor. It is important to choose a paint that is safe for children and adheres well to the material of the toy.
2. Do I need any special brushes for toy painting?
While you can use regular paintbrushes, it is recommended to use brushes specifically designed for toy painting. These brushes often have softer bristles and a smaller size, allowing for more precise and controlled painting.
3. How do I prepare my toy for painting?
To prepare your toy for painting, start by cleaning it thoroughly to remove any dirt or dust. You may also need to sand the surface slightly to create a smooth and paint-friendly texture. Make sure to cover any parts or areas that you don’t want to paint using masking tape.
4. How can I achieve a textured effect on my toy?
To create a textured effect on your toy, you can use various techniques such as dry brushing, stippling, or sponge painting. Experiment with different methods to achieve the desired texture and visual interest in your toy painting.
5. Is it necessary to prime the toy before painting?
While not always necessary, priming your toy before painting can help improve the adherence of the paint and ensure a more even and long-lasting finish. Use a primer that is suitable for the material of your toy.
6. Can I repaint a toy that already has paint on it?
Yes, you can repaint a toy that already has paint on it. However, it is essential to remove the existing paint first using sanding or stripping techniques. This will help the new paint adhere better and prevent any unwanted texture or flaking.
7. How do I add details and fine lines to my toy painting?
To add details and fine lines to your toy painting, use a fine-tip brush or a liner brush. These brushes allow for precise and controlled strokes, enabling you to create intricate designs and accents on your toy.
8. Can I use spray paint for toy painting?
Yes, spray paint can be used for toy painting, especially for larger surfaces or achieving a smooth and even finish. However, it is crucial to use spray paint in a well-ventilated area and follow the safety instructions provided by the manufacturer.
9. How can I make my toy painting waterproof or resistant to wear and tear?
To make your toy painting waterproof or resistant to wear and tear, consider applying a clear varnish or sealant. This protective coating will help preserve the paint job and ensure its durability, especially if the toy is meant to be played with or exposed to certain environmental conditions.
10. Are there any safety precautions I should consider when toy painting?
Absolutely. When toy painting, make sure to work in a well-ventilated area and protect yourself by wearing gloves, a mask, and appropriate clothing. Keep paints and brushes away from children and follow any safety guidelines provided by paint manufacturers.
Final Thoughts
Exploring step-by-step tutorials for unique toy painting techniques can bring immense joy and satisfaction to both children and adults. Not only does it provide an opportunity to personalize toys, but it also encourages creativity and imagination. Whether you’re a beginner or an experienced artist, these tutorials offer valuable insights and inspiration to elevate your toy painting skills to new heights.
Remember, practice makes perfect, and don’t be afraid to experiment with different techniques and colors. Embrace the journey of toy painting and discover the endless possibilities that can transform ordinary toys into extraordinary works of art. So, grab your brushes, unleash your inner artist, and let the colorful world of toy painting unfold before your eyes.