Personalized engraving on wooden toys is a technique that allows individuals to customize and create unique designs on wooden toys. Unlike mass-produced toys, personalized engraving adds a touch of individuality and personalization, making each toy truly one-of-a-kind. Engravers use specialized tools and techniques to etch names, messages, or patterns onto the surface of wooden toys, creating a lasting impression. This popular trend has gained significant attention in recent years as people seek personalized gifts and keepsakes for their loved ones. Not only does personalized engraving enhance the aesthetic appeal of wooden toys, but it also adds sentimental value to the item, making it a cherished possession.
Personalized engraving has a profound impact on the gift-giving experience. By adding a custom touch to wooden toys, individuals can create meaningful and thoughtful gifts for birthdays, holidays, or special occasions. Whether it’s a child’s name engraved on a wooden train set or a personalized message on a dollhouse, the recipient will appreciate the time and effort put into creating such a unique gift. Moreover, personalized engraving on wooden toys also serves as a way to foster imagination and creativity in children. The engraved designs can spark curiosity and storytelling, encouraging imaginative play and cognitive development.
In the next part of this article, we will discuss the key takeaways and considerations for mastering personalized engraving on wooden toys. We will explore the different types of engraving techniques, suitable wooden materials, and tips for creating professional-looking designs. Stay tuned to discover how you can create stunning, personalized wooden toys that capture the hearts of both children and adults alike.
Key Takeaways
1. Wooden toys are a popular choice for personalized engraving due to their durability and timeless appeal. Engraving can be done using various tools such as laser engravers or hand-held tools.
2. Before starting the engraving process, it is crucial to prepare the wooden toy by sanding it to create a smooth surface. This ensures better engraving results and prevents splintering or damaging the toy.
3. Designing the engraving is an important step that requires careful consideration. It is recommended to start with a simple design and gradually progress to more complex patterns. Factors like font choice, size, and spacing should be considered for a visually appealing result.
4. When engraving, it is essential to maintain a steady hand and consistent pressure to achieve precise and clear lines. Practice on scrap wood or other materials before engraving on the actual toy to develop confidence and accuracy.
5. To enhance the overall appearance of the engraved wooden toy, applying a protective finish is recommended. This not only safeguards the engraving but also gives the toy a polished and professional look. Options like beeswax, linseed oil, or varnish can be used depending on personal preferences.
How can you master personalized engraving on wooden toys?
Choosing the Right Wooden Toy
Before you start engraving, it’s important to select the right wooden toy for your project. Look for toys that have a smooth surface and are made from high-quality wood. This will ensure that the engraving process goes smoothly and the final result looks professional.
Gathering the Necessary Tools
To master personalized engraving on wooden toys, you’ll need a few essential tools. These include a wood burning tool or a laser engraver, sandpaper, stencils or templates, and protective gear such as gloves and goggles. Make sure you have all these tools ready before you begin your project.
Preparing the Surface
Before you start engraving, it’s crucial to prepare the wooden toy’s surface properly. Sand the surface with fine-grit sandpaper to ensure it’s smooth and free from any rough edges or imperfections. This will help the engraving process go more smoothly and ensure the final result looks clean and polished.
Designing and Transferring the Personalized Pattern
Next, you’ll need to design or choose a personalized pattern for the engraving. You can use stencils, templates, or even create your own design. Once you have the pattern ready, carefully transfer it onto the wooden toy’s surface using graphite paper or a pencil. This will act as your guide during the engraving process.
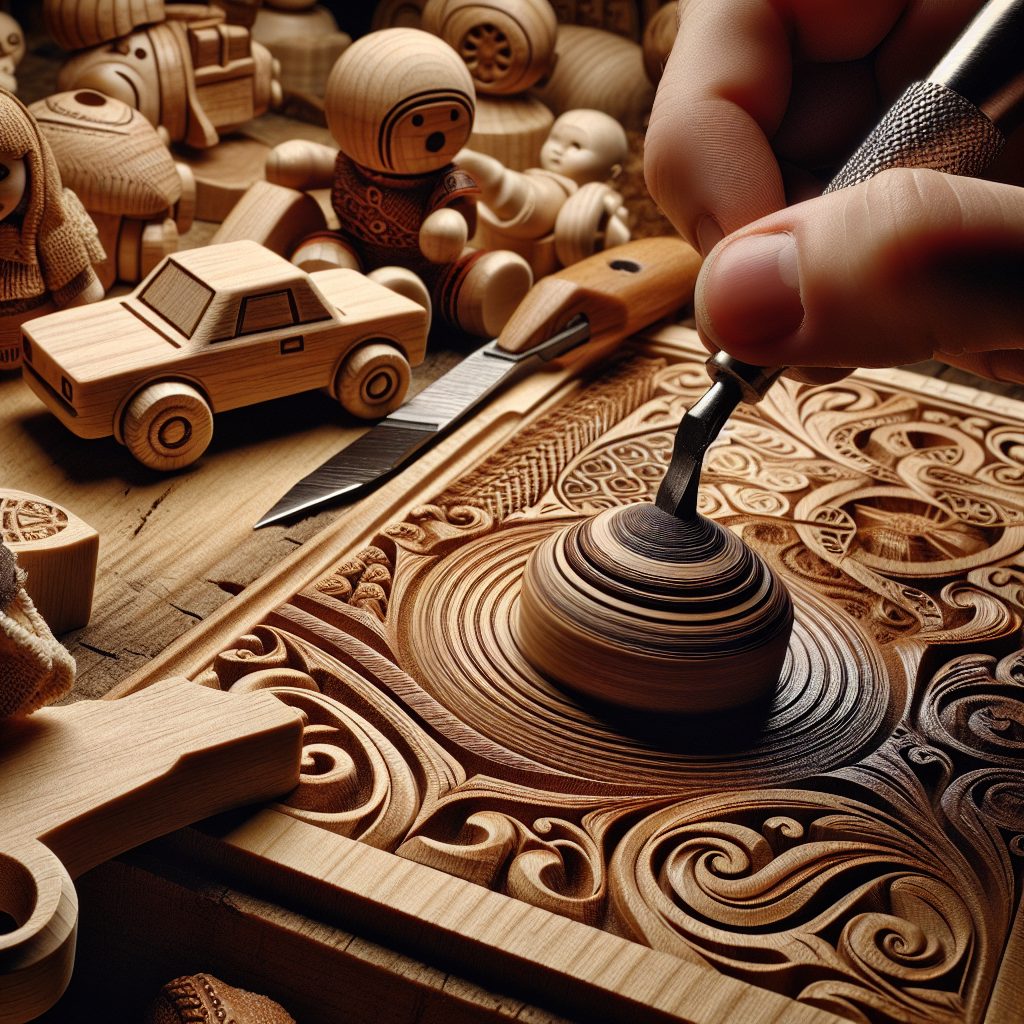
Engraving Techniques and Tips
Now that the preparation is done, it’s time to start engraving. Depending on the tool you’re using, follow the appropriate engraving technique. If you’re using a wood burning tool, gently apply the heated tip onto the wooden surface and create precise strokes to form the desired pattern. If you’re using a laser engraver, adjust the settings according to your design and let the machine do the work.
Here are some tips to keep in mind while engraving:
- Start with light pressure and gradually increase it for deeper engraving.
- Take breaks periodically to allow the tool or machine to cool down.
- Work in a well-ventilated area or wear a mask to avoid inhaling fumes.
- Maintain a steady hand and move the tool or toy slowly for better control.
- Practice on a scrap piece of wood before engraving the final toy.
Finishing and Sealing the Engraved Toy
Once the engraving is complete, take the time to finish and seal the wooden toy. Apply a wood finish or sealant to protect the engraved design and enhance the toy’s overall appearance. Follow the instructions provided by the manufacturer for the best results. Allow the finish to dry completely before handling the toy.
How can you ensure the longevity of personalized engraving on wooden toys?
While personalized engraving on wooden toys can look beautiful, it’s essential to take steps to ensure its longevity. Here are some tips:
- Avoid exposing the engraved toy to excessive moisture or direct sunlight, as these can cause the wood to warp or fade over time.
- Regularly clean the engraved surface with a soft cloth to remove dust or dirt that may accumulate.
- Store the engraved toy in a cool, dry place when not in use to prevent damage.
- Consider using a protective case or display stand to showcase the engraved toy and minimize the risk of accidental damage.
- If you notice any signs of wear or fading on the engraving, touch it up with a wood stain marker or seek professional help to restore its appearance.
Frequently Asked Questions
1. Can I personalize any wooden toy?
Yes, you can personalize most wooden toys by engraving them with a special message, name, or design.
2. What tools do I need to engrave wooden toys?
To engrave wooden toys, you will need a woodburning tool, engraving tips, sandpaper, and a protective mask for safety.
3. Can I engrave on painted wooden toys?
It is best to avoid engraving painted wooden toys, as the paint may chip or crack during the engraving process. It is recommended to engrave on unpainted wooden surfaces.
4. How do I choose the right font for engraving?
When selecting a font for engraving, consider the size of the toy and the level of detail you want to achieve. It is recommended to use clear and legible fonts that complement the toy’s design.
5. Is it possible to fix a mistake during engraving?
Unfortunately, it can be challenging to fix mistakes once the wood has been engraved. It is crucial to double-check the spelling and design before starting the engraving process.
6. Can I engrave on curved or irregular wooden surfaces?
Engraving on curved or irregular wooden surfaces can be more challenging but not impossible. It requires greater precision and control with the engraving tool to ensure accurate and consistent results.
7. How do I clean and maintain personalized engraved wooden toys?
To clean and maintain personalized engraved wooden toys, use a soft cloth or brush to remove dust and debris. Avoid using water or harsh cleaning chemicals, as they may damage the engraving or the wood.
8. Can I engrave complex designs or images on wooden toys?
Engraving complex designs or images on wooden toys is possible but requires advanced skills and specialized tools. It is essential to practice and experiment on scrap wood before attempting intricate engravings.
9. What safety precautions should I follow while engraving?
When engraving on wooden toys, always wear a protective mask to avoid inhaling wood dust. Additionally, ensure that the workspace is well-ventilated and be cautious with the hot engraving tool to prevent burns.
10. Where can I find inspiration for personalized engraving designs?
You can find inspiration for personalized engraving designs through various sources such as online platforms, woodworking magazines, or by observing nature and other artistic works. Additionally, you can create your own unique designs.
Final Thoughts
Mastering personalized engraving on wooden toys allows you to transform ordinary playthings into cherished keepsakes. The art of engraving offers a wonderful opportunity for personalization, whether as a heartfelt gift or a way to add an extra touch of creativity to wooden toys. With the right tools, techniques, and a dash of imagination, you can embark on a fulfilling journey of creating timeless treasures for loved ones.
Remember, practice makes perfect when it comes to engraving. Start with simple designs and gradually challenge yourself with more intricate patterns. Don’t forget to enjoy the process and embrace the uniqueness of each engraved creation. Let your creativity and passion guide you as you embark on this rewarding endeavor of mastering personalized engraving on wooden toys.