Assembly Tips for DIY Wooden Toy Car Enthusiasts
If you are a DIY wooden toy car enthusiast, you know the joy of assembling these timeless treasures. Building your own wooden toy car not only allows you to unleash your creativity but also provides a satisfying feeling of accomplishment. Whether you are just starting out or have been a long-time enthusiast, understanding the essential assembly tips can make a significant difference in the outcome of your project.
One unique insight worth mentioning is that the assembly process of a wooden toy car can greatly impact its overall functionality and durability. From ensuring precise measurements to using high-quality materials, every step in the assembly is crucial. It’s fascinating how minor details such as the alignment of the wheels or the tightness of the screws can determine the smoothness of the car’s movement. By paying attention to the specific impacts and unique features of assembly, you can elevate your wooden toy car to the next level.
Now that you’re aware of the importance of proper assembly, let’s delve into the key takeaways to help you build your dream wooden toy car. In the following sections, we will explore some essential tips and tricks that will not only make your assembly process easier but also enhance the overall quality of your finished product. From selecting the right tools and materials to mastering the art of sanding and painting, these insights will equip you with the knowledge and skills needed to create a truly remarkable wooden toy car. So, gather your tools, let your imagination soar, and let’s get started on this exciting journey of assembling the perfect DIY wooden toy car.
Key Takeaways
1. Start by carefully reading and understanding the toy car assembly instructions to ensure a smooth construction process. Taking the time to familiarize yourself with the steps and required materials will prevent mistakes and save time in the long run.
2. Use the appropriate tools for the job, such as clamps, sandpaper, and a drill, to ensure precision and quality in your wooden toy car. Using the correct tools will make the assembly process easier and help avoid damage to the materials.
3. Pay attention to the details, such as sanding the edges to avoid splinters and ensuring a snug fit for all the car’s parts. Taking the time to fine-tune the details will not only enhance the appearance of the toy car but also improve its functionality and durability.
4. Consider personalizing your wooden toy car by adding unique features or decorations, such as custom paint jobs or personalized license plates. Adding personal touches will make the toy car more special and tailor it to your preferences or the recipient’s.
5. Once the wooden toy car is assembled, regularly clean and maintain it to prolong its lifespan and keep it looking its best. Dusting and polishing the car, tightening any loose screws, and storing it properly will ensure that it remains in good condition and can be enjoyed for years to come.
What are the Best Assembly Tips for DIY Wooden Toy Car Enthusiasts?
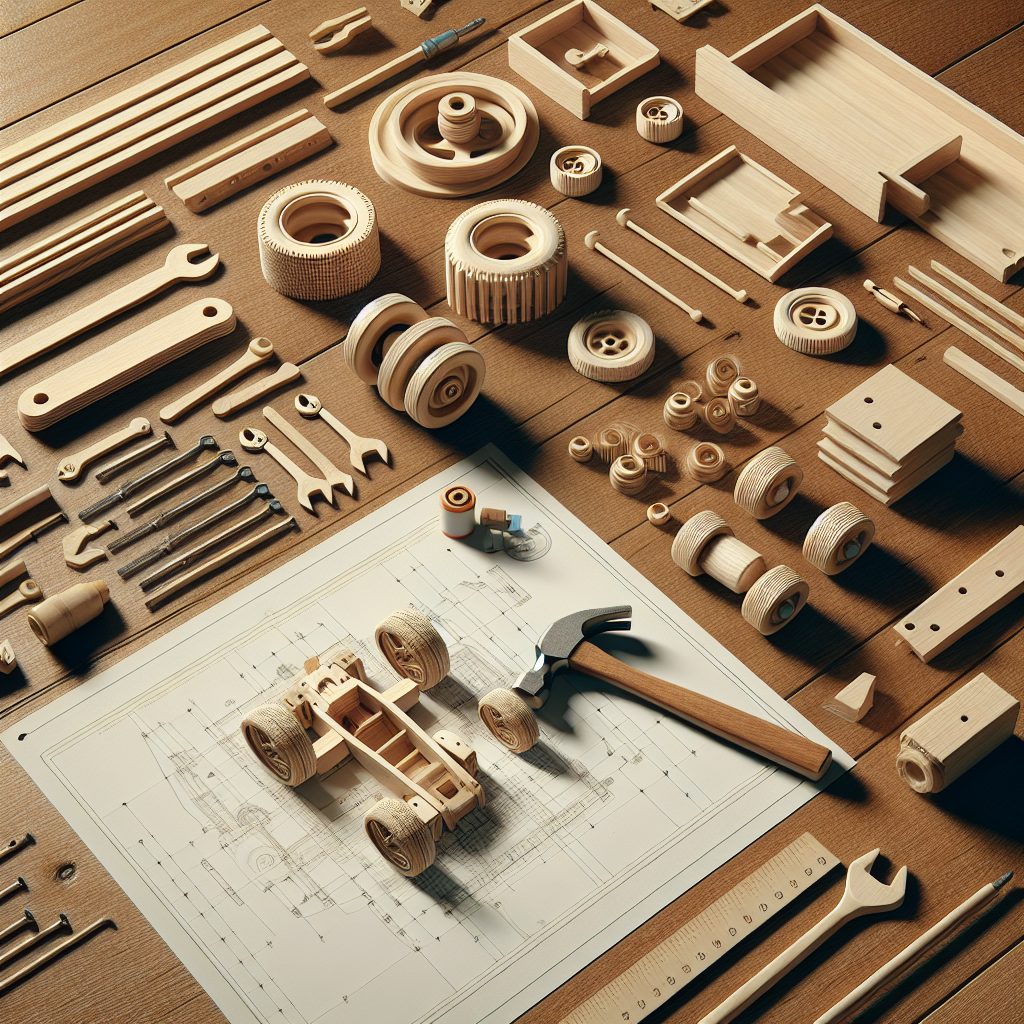
Gathering the Necessary Tools and Materials
To start off your wooden toy car assembly project, it is crucial to gather all the necessary tools and materials. Make sure you have a screwdriver, sandpaper, wood glue, clamps, wooden blocks, wheels, axles, and paints. Having all these items organized and easily accessible will save you time and effort during the assembly process.
Preparing the Wooden Pieces
Before beginning the assembly, it is essential to prepare the wooden pieces by sanding them down. Use sandpaper to smooth out any rough edges or surfaces, ensuring that the pieces fit together seamlessly. This step will create a clean and polished finish for your toy car.
Following the Assembly Instructions
Many DIY wooden toy car kits come with detailed assembly instructions. It is essential to carefully read and follow these instructions step by step. This ensures that you assemble the toy car correctly and avoids any confusion or mistakes. If your kit does not include instructions, you can search for online resources or tutorials specific to your model.
Applying Wood Glue and Using Clamps
Wood glue is crucial in creating a strong and durable bond between the wooden pieces. Apply a small amount of wood glue to each joining surface and press the pieces firmly together. To secure the pieces in place while the glue dries, use clamps to hold them together. Clamping ensures that the pieces are aligned properly and prevents any movement during the drying process.
Adding Wheels and Axles
After assembling the main structure of the toy car, it’s time to add the wheels and axles. Depending on your design, you may need to drill holes in the wooden body to attach the axles. Insert the axles through the holes, making sure they rotate smoothly. Attach the wheels to the axles securely, ensuring they are aligned correctly and can freely spin.
Personalizing and Painting the Toy Car
Now that your wooden toy car is fully assembled, it’s time to unleash your creativity and add a personal touch. Use paints or markers to decorate the car’s body, giving it a unique and customized look. You can experiment with different colors, patterns, and even add decals to enhance its overall appearance.
5 Essential Tips for a Successful Assembly
- Double-check the assembly instructions before starting to ensure you understand each step.
- Take your time during the assembly process to ensure precision and avoid mistakes.
- Apply the right amount of wood glue – too little may result in weak joints, while too much can create a messy finish.
- Invest in high-quality wooden toy car kits to ensure durability and ease of assembly.
- Experiment with different designs and personalize your toy car to make it truly unique and special.
Frequently Asked Questions
Can I assemble a wooden toy car without any prior experience?
Absolutely! Our assembly tips are designed to guide both beginners and experienced enthusiasts through the process. With clear instructions and detailed diagrams, even those new to DIY projects can successfully assemble a wooden toy car.
What tools will I need to assemble the wooden toy car?
The tools required for assembly are relatively simple and commonly found in most households. You will need a set of screwdrivers, sandpaper, wood glue, a small saw, and some clamps. These tools will ensure a smooth and hassle-free assembly process.
Can I customize the design of my wooden toy car?
Absolutely! One of the joys of DIY projects is the ability to add your personal touch. Our assembly tips provide a solid foundation, but feel free to get creative with the design. You can paint the car in any color you like, add decals, or even modify the shape slightly to make it truly unique.
Are the wooden toy car kits suitable for children?
While the assembly process may require adult supervision or assistance, the finished wooden toy car is indeed suitable for children. We ensure that all components are safe and free from any potential hazards. However, it’s important to always consider the age appropriateness and ensure small parts are not accessible to very young children.
How long will it take to assemble the wooden toy car?
The assembly time can vary based on your experience level and the complexity of the design. On average, it takes approximately 1-2 hours to complete the assembly. However, we always recommend taking your time and enjoying the process, ensuring a high-quality final product.
Can I disassemble and reassemble the wooden toy car?
Yes, you can disassemble and reassemble the wooden toy car if desired. The components are designed to fit together securely while allowing for easy disassembly without causing any damage. This feature is particularly useful if you wish to repaint or modify your wooden toy car in the future.
What type of wood is used in the wooden toy car kits?
We use high-quality, sustainably sourced hardwood for our wooden toy car kits. The specific type of wood may vary depending on availability, but it is typically a durable hardwood like birch or maple. This ensures the longevity and sturdiness of your finished toy car.
Are additional finishing touches required after assembly?
Once you have completed the assembly, you may choose to add some finishing touches to enhance the overall appearance. Lightly sanding any rough edges, applying a non-toxic sealant or varnish, and polishing the surfaces can give your wooden toy car a professional and polished look.
Can I find replacement parts if needed?
Yes, we offer replacement parts for our wooden toy car kits. If you ever need to replace a damaged or lost part, simply get in touch with our customer support team, and they will assist you in obtaining the necessary components to complete your toy car.
Are there any safety precautions to consider during assembly?
While assembling the wooden toy car, it is recommended to wear protective eyewear and use caution when handling tools. Be mindful of sharp edges when working with wood, and ensure a well-ventilated workspace when using adhesives or sealants. Safety should always be a priority to prevent accidents or injuries.
Final Thoughts on Assembly Tips for DIY Wooden Toy Car Enthusiasts
Assembling a wooden toy car can be a rewarding and enjoyable experience for DIY enthusiasts of all ages. Not only does it exercise your creativity and problem-solving skills, but it also offers a sense of accomplishment. The tips provided here aim to make the assembly process smooth and accessible to everyone, ensuring a sturdy and beautifully crafted toy car.
Remember, the journey is just as important as the destination. Allow yourself to immerse in the process and take pride in each step. Whether it’s a gift for a loved one or a personal project, the end result will be a unique and cherished wooden toy car that brings joy to both the creator and the recipient.